Sunday 31 July 2011

Cheesy Bruschetta Chicken


Like it or not, one of the perks of being a teacher is being home in the summertime. It just gives you time to relax and do things at a more natural pace. I was looking in my freezer, trying to figure out what to take out for dinner. Bone-in, skin-on chicken thighs, one of my favs. I was thinking something tomato-ey, but knew it was a little hot for a cacciatore. Over the course of the day, I thought about what I had available. Some ends of two local cheeses, one goat, one brie-like cow cheese, fresh tomatoes, and of course my herb garden. AH! Bruschetta, chicken, and gooey cheese. How can you go wrong?
So I came up with this recipe, which I served with a green salad with the addition of basil, chives, oregano, feta, and a standard red wine vinegar dressing  (note to self - the hubster will pretty much eat any vegetable if I stick feta cheese in with it...). Oh, and of course a couple of good glasses of wine.


Recipe (serves 3-4):

Chicken:

6 chicken thighs (or 4 chicken breasts)
1/4 dried basil
1/8 tsp garlic powder
Red chili flakes and s & p to taste
About 4 oz stinky, gooey cheese (whatever you like)

Bruschetta:

2 chopped tomatoes
3 tbsp fresh chopped basil
2 cloves of chopped garlic
2 tbsp extra virgin olive oil
1-2 tbsp balsamic vinegar
2 sundried tomatoes, finely chopped (optional - I didn't have any, but they are a great addition if you have them on hand)
s & p to taste


Season the chicken thighs with dried herbs and spices. I swear, I never use garlic powder, but I knew if I used fresh garlic in this case, it would burn, and I wanted that extra layer of flavouring. Roast chicken in the oven on 425°F for about 35 minutes. Check by poking a hole. If the juices run clear, it's cooked. Broil skin if not dark enough.


While the chicken is cooking, add all the bruschetta ingredients into a bowl. It's pretty juicy, but great for bread-mopping purposes....


Slice up your cheese into smaller pieces. Remember, in this case a little goes a long way, you don't need to kill it with the cheese. A minute or two before the chicken is done, stick a couple of little pieces on top of each thigh and stick it back in the oven until it starts to ooze.


Plate the chicken, and smother it with the bruscetta, and serve it with a grean salad. Don't forget the wine!
Happy Sunday!

Friday 29 July 2011

Feature Friday - July 29, 2011

Welcome to the second edition of Feature Friday, the day where I feature a recipe that really embodies what the Mediterranean Diet is about: whole foods, fresh, seasonal ingredients, and simple, wonderful flavour.

In the short time that I've been writing this blog, I've been so excited to find other blogs who do focus on these ideals, and this week I'm featuring not only a recipe, but a blog. Roz, from la bella vita, really gets this whole lifestyle, and her blog is amazing and inspiring. You should check it out, and I definitely suggest you follow her. Earlier this week, Roz shared her idea for Panzanella Frittata, which not only is full of fresh, delicious ingredients, but also uses up left-overs, which is a real necessity in my books. We've all been in that spot where, at the end of the week, we find we've put things in the fridge with the intention of using them up, only to realize that we've missed the boat and it's too late.

Roz' Panzanella Frittata features a leftover Panzanella, which is a classic tomato-bread salad with fresh basil, which she took the bread out of, fried up a little, added eggs and baked into a beautiful, fluffy, browned frittata. It looks beautiful and delicious!


In the summer, personally I find that I'm driven towards salads and bbq, but recently I've been reminded that eggs are actually a perfect vehicule for showing off the fresh ingredients of summer. In this case, fresh tomatoes, basil and red onions. As another example, I recently took a trip to the farmer's market and bought some duck eggs, which are wonderfully fluffy and highly nutritious (and would be an excellent option for this recipe), and cooked them up with fresh chives and local cheese. Eggs are also perfect for summer, because they are so quick to cook up. Roz' recipe only went into the oven for 10 minutes.

Thanks for the inspiration Roz. I look forward to reading more of your recipes in the future! Dearest Reader's, check her out today!

If you have a recipe you'd like to have featured on Feature Friday, please let me know. And if you do get featured, feel free to grab my button!

Have a fantastic Friday all!

Thursday 28 July 2011

Nutella Mascarpone Calzone

This is a recipe that I featured in a past blog, and I thought I'd re-share because it's so fabulously simple, not to mention gooey and delicious. It exemplifies how good, basic ingredients can be turned into a special treat when eaten in moderation. Oh, and I must give credit to David Rocco for the general idea. He's so awesome...


THE RECIPE


  • Make or buy your favourite pizza dough (see below for recipe)
  • Roll out dough to be maybe 1/4 inch thick (it will puff up in the oven!)
  • Spread a good amount of Nutella on one half of the dough and mascarpone cheese or cream cheese on the other half.
  • Optional: a few handfuls of chopped hazelnuts or other nuts
  • Fold over the pizza dough and pinch edges together

Either:


  • Brush with olive oil and a few pinches of salt (very interesting)

OR


  • Brush with melted butter and a tbsp or two of sugar
  • Bake on pizza stone or cookie sheet in a preheated oven at 400°F for about 15 minutes

Pretty excellent with good vanilla ice cream...


Here's my favourite pizza dough recipe for bread machines:


Add ingredients into basket according to your bread machine's directions. Usually the process is: wet ingredients first, followed by dry. Make a small well with your finger in the flour and carefully add yeast to the well.
  • 1 1/8 cups water
  • 1 1/2 tbsp olive or canola oil
  • 3 cups all-purpose flour
  • 1 1/2 tsp salt
  • 1 1/2 tsp yeast

Lock and Load!

Wednesday 27 July 2011

Wednesday Weigh-In July 27, 2011

Well folks, another but slow but progressing week. I went down another .5 of a pound. But you know what? I don't really mind the slowness of my progression, because I am really not dieting, I feel great about the food I'm eating, and I've been working on being more active. I can genuinely say I am not dieting. And not in the way people on restrictive diets make the same claim, been there, done that. Here are some things I've been enjoying this week:

  • I am not the least bit restricted. I am paying attention to my body's signals and what it needs, and not following what someone else decided it needs.
  • I eat very high quality (not necessarily expensive, though) food which is DELICIOUS, I take my time eating it, and can spend as much (or little) time thinking about what I will eat as I want, but with no negative feelings of "Oh, that's to many points" or "I can't afford to fit that in." Instead, I'm excited about what I will eat, and think "I can't wait to eat that."
  • I also went biking this week for the 1st time this year, and probably the 5th time since I was a kid. I got a new gel seat, and it makes all the difference. I really enjoyed myself, and hope to get better at it. It's such a worthwhile activity, as the University of Leicester semi-jokes about:
Benefits of a bicycle cartoon


So here are the stats:

Original Start Weight: 173
07/13/2011 Start Weight: 155 lbs
Present weight: 154 lbs
Goal Weight: 130-135 ish lbs


Have a great day!

Tuesday 26 July 2011

Greek Salad


When I first thought about venturing into the concept of this blog, this recipe, however simplistic, was the one that kept popping into my head as a perfect fit, and I couldn't wait to share it with you. Here's my take on Greek Salad, and I must say, it's my personal favourite. You see a lot of variations on Greek Salad, or Horiatiki, but mine is the traditional. To this day, whenever I enter a restaurant and see a Greek Salad on the menu, and right next to it a picture of a big pile of lettuce with a few mealy tomatoes, onions and an olive, I get this little twinge of wrongness. It's not to say that Greeks don't use lettuce in their salads, on the contrary, they do all the time. But when you're talking about an authentic Greek House Salad, this is the one.

You may notice that it has an unusual oil to vinegar ratio - 1:1. But I just don't find this salad needs much oil. As you wish, though. I will say that many people don't even put anything acidic on it, but personally I find it really needs it. This recipe, as most European recipes go, is one that you should just learn to eyeball so you can just dump it in the bowl. I happen to be pretty good at doing this, and this is what I put in. If you can find the real Greek feta, pay the extra for it. Bulgarian or Sheeps/ Goats milk feta are great, more affordable alternatives.

Recipe (Serves 4 as a side dish or 2 as a main meal):

2 tomatoes, cut into wedges or about 1 1/2 cups cherry tomatoes, halved
1 1/2 cups cucumber, quartered and then sliced
1/2 a green pepper, chopped (optional - I usually don't do this, but some people do)
1/2 to 3/4 cup Greek feta
a handful of olives
1/4 of an onion, thinly sliced
2 Tbsp dried oregano
1/4 cup extra virgin olive oil
2 Tbsp lemon juice
2 Tbsp regular white, or red wine vinegar
1/2 clove minced garlic - optional
a good amount of salt

Literally, dump it all in. That's all! You do need to taste and see if the seasoning is to your own liking, because everyone is different. If you want to be fancy, save a little feta, olives, oregano and oil, and after mixing it all up, sprinkle it on top. At least, I think it looks nice that way. Here you go!


Great with souvlaki, chicken, salmon, my zucchini patties, or pretty much anything. Or, can be a great meal along with some baguette, tzatziki and a great glass of red wine. Heaven!

Have a great day!

Monday 25 July 2011

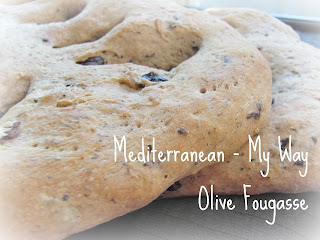
Olive Fougasse


A couple of our local bakeries make this delicious bread, Olive Fougasse, a popular French bread sort of comparable to a more rustic Focaccia, and I've always been in love with it. It's salty, flavourful, and has olives in it - not to mention, it's fun to break apart. What's not to like? The only issue I've had is that it costs about $5 in the store... Kind of a lot in my books. So when I got my breadmaker last year, naturally I went on the hunt for a comparable recipe. And here it my version. The original recipe can be found HERE, and if you want to make this bread by hand, you should check out the method used, as I always use a breadmaker and I changed it up to work with the machine. I've also adapted the recipe a bit, first of all I opted for quick-rise yeast, which makes the process a lot quicker, and I also changed out some of the regular flour for whole wheat. By the way, I estimate that this bread costs about $2 for two loaves. Pretty great savings.

Ingredients:

1 2/3 cups plus 2 teaspoons water
1 3/4 teaspoons quick rise yeast
1 teaspoon sugar
4 1/2 tbsp plus 1 tbsp extra-virgin olive oil
3 1/2 cups all-purpose flour (plus extra in case dough is too wet)
1/2 cup whole wheat flour
1 1/4 teaspoons salt
1 cup oil-cured black olives, pitted and coarsely chopped
1 tablespoon minced fresh rosemary, or 1 tsp dried
Grated zest of lemon or 1/2 orange (I used a grapefruit, it's what I had available)
Kosher salt or other coarse salt, for sprinkling


Get all of your ingredients out and ready. I realized a couple of years ago that the easiest way to pit an olive is to squash it with the back of your knife first, sort of like a garlic clove.


Then you can easily tear it open, and pull out the pit.


First, add all ingredients except rosemary, olives, and the 2 tsp water and 1 tbsp oil to your mixer, and mix on the dough cycle. Before the last "spin," add the olives and rosemary. I found on this particular day (remember, weather really changes dough consistency) that I needed to add a lot more flour when I added the olives. I added a big spoonful at a time, but I'd estimate about 1/3 to 1/2 of a cup more. You can tell by looking at the picture that this is a wet, soft dough by nature, because it's not as smooth as a normal dough, but you have to make sure that it forms a ball, and doesn't sort of spin off because its too wet at the bottom of the machine.


Pull the dough out of the mixer, and cut it in two.


Stretch out the dough by hand into a rectangular-ish shape of about 12' by 7 or so.


Ideally use a pizza cutter, otherwise a small knife, to make 4 diagonal slits on each side of the dough, sort of imitating veins on a leaf. Pull on the slits to make holes of at least 1' by 2'. Transfer the dough onto a baking sheet, and even better onto a Silpat baking liner. Repeat with the second dough, or save it in the fridge for up to 3 days. I personally opted to bake them both, and ended up freezing the second one for another day. Bonus!


Let the dough rise for about 15 minutes, covered. In the meanwhile, preheat the oven to 450° F. Then, prick the dough lightly with a fork, and brush with the remaining olive oil and water, which need to be mixed together. Sprinkle with kosher salt. Bake for 10 minutes on the middle or lower rack, and then rotate the pans and bake for another 10 minutes. I must say I cooked mine for a little longer than that. Maybe 3 minutes, but always gage depending on your own oven.


Et voilà! This bread sounds like it has lots of steps, but actually was really quick to make. It would be great on an hors d'oeuvre table, with any meal or even on it's own.

Bon appetit!

Saturday 23 July 2011

Zucchini Patties


Kolokithokeftedes - Basically Greek for Zucchini Meatballs - are one of my favourite things. In fact, would it not be for the mess I make everytime I get around to making them, I would probably eat them every week. It's not that it requires sooo many bowls or tools or anything like that... you know, I'm not really sure what it is. But quite honestly, I do have a tendancy to turn a perfectly clean kitchen into what looks like a crime scene in about 5 minutes. What can I say, my brain is way more artistic than it is organized.

Seriously, this is one of my best recipes. I've been making these for years. I have even made a few batches ahead of time at Christmas and reheated them in the oven upon arrival. Everyone seems to love them, and I have passed on the recipe to many family members, especially my mom.

The recipe comes from my trusty old Greek cookbook, called Greek With Gusto, by Nicholas and Julie Roukes. You can tell I use it alot because it's covered in.... recipe stuff...

Greek With Gusto!: Greek Cuisine - Easy and Delicious

Anyway, here we go, the ingredients:

3 cups grated zucchini
1 medium onion, finely chopped
2 cloves minced garlic
1/2 cup chopped fresh parsley (I prefer flat leaf)
2 eggs, beaten
1 cup bread crumbs
3 tbsp crumbled feta, parmesan, or kasseri cheese
salt and pepper
2 tbsp olive oil
flour for dredging


After you grate up the zucchini, like this, you need to wrap it in cheesecloth (I use a bunch of papertowels, actually) and really squeeze the liquid out of the zucchini. I have forgotten to do this once or twice, and the mixture ends up obviously watery, but worse not really sticking together. You so don't want that.


Combine everything in the bowl. As for the cheese, I sorta go with whatever I have on hand. Kassari is a mild cheese, the one you may have seen in restaurants used for Saganaki, or fried cheese.

Anyway, so form the patties. I uaully make them like a mini hamburger or potato latka sort of shape. You can also make them into a meatball shape, which is cute for serving. The book also says you could use them for a veggie burger, though there is not a ton of protein in them. You need to dredge the mixture in flour. Years ago when I first read this recipe, I had to guess a little at what that meant. Basically you coat the zucchini patty lightly by dipping one side and then the other in the flour, and then sorta shake it off in your hand by passing it back and forth from one hand to another. At least, that's the way I do it.


So heat up your pan to medium-ish. I must confess I always end up going up and down with the temp on this recipe. But you'll know if it's sizzling away a little too much, like anything else. They tell you to use 2 tbsp of olive oil. I definitely might start with that, but usually end up cooking this in batches so probably use that much per however many batches I make.  Flip em, and above you can see what I consider to be the idea colour.


And here's what they end up looking like. I was short on breadcrumbs that day and just sort of tried to alter things accordingly, which meant they didn't stick together as much as usual. I ALWAYS serve these with tzatziki (the best part of any Greek meal in my books), but if you don't have any, they are also good with sour cream.

I hope you enjoy my recipe. I know I sure love it.
Have a great weekend!

Friday 22 July 2011

Feature Friday

It's a whole foods revolution out there, folks!

I was doing the rounds, showing some link-love over at Everyday Tastes' It's a Keeper Thursday, which you can check out here:

It's a Keeper

I've been noticing all of the great recipes posted on that site and other sites, and every once in a while I come across that I find fits in with all of the rules of the Mediterranean Diet. You know, real, fresh ingredients, simply but deliciously prepared... you get the idea.  Well, I came across a great recipe that inspired me to start up something new: Feature Friday. What does that mean? Well, you probably figured it out. Every Friday, I'd like to showcase a recipe done by someone else that goes along with the rules of what I've been doing.

Today's Feature Friday:

Simple Girl posted this fantastic looking recipe on her blog, which you should totally GO CHECK OUT HERE, for Heirloom Tomato Pie. She found the recipe in the Food Network Magazine, which I love.  In her post, she whips up an easy cornmeal crust, a cheesy mayo based filling (everything's better with mayo in my books) and then tops it all off with some beautiful heirloom tomatoes she found at a farmer's market, basil and kosher salt... Simple, beautiful, certainly delicious, and VERY Mediterranean. Check it out right here:


Check out those beautiful heirloom tomatoes!


Thanks, Simple Girl, for inspiring us with your lovely looking recipe. A must-try for sure!
Please let me know if you have a recipe you'd like to share on my next
Feature Friday.

Have a great weekend.


Thursday 21 July 2011

Greek Frappé

So, today I'll be sharing a traditional Greek family recipe that I have passed along to many people. Frappé is the Greek version of iced coffee. It is super cheap, couldn't be quicker, and not to mention DELICIOUS! In Quebec, we are in the middle of a heat wave, and today the temperature is supposed to reach 44° C with the humidex, or about 111° F. What a scorcher! So this past week, I've been going for this icy option instead. Greeks are a VERY proud people (I can say that, as I'm married to one) and they are extremely proud to show off this recipe. I must say, though, that all of the ingredients are to my own personal preference. As with a hot cup of coffee, this amounts you use for this coffee should be modified to your liking. 

72" FRAPPE BANNER SIGN greek iced coffee cart cold signs

As for the coffee used in this recipe, let me just reassure everyone that I am SO not an instant coffee kind of girl when it comes to hot coffee, so don't through away the idea if you're not either. I am a 100 % drip coffee always with cream and sugar girl all the way. But in this case, it totally works. No blender, no freezing ice cubes, immediate results! There is a special instant coffee made for Frappé that you can check out here, but I haven't tried it out. Actually, there's even a book about it. One day I'll splurge, but everyone I know seems to use Maxwell House for this recipe. Currently I have this blend, but I must say my brother in law uses the regular strength, and I like it better. It's less bitter. But here you go:

You'll need:


  • A drink shaker, or any sturdy jar with a tight-fitting lid
  • 1 heaping tsp instant coffee
  • 1 tsp sugar
  • 5ish ice cubes
  • 3/4 cup water
  • 3/4 cup skim milk
I could give you pictures of me adding in each ingredient... but I think you're all better than that. Dump 'em all in! Shake, shake, shake!  I use a shaker like this one:

Premium Cocktail Shaker Set - 24 oz Stainless Steel

A word of warning - on more than one occasion, I've been super happy about the upcoming Frappé and started busting a move, letting one hand off the shaker. Needless to day, I found coffee stains all over my white and grey kitchen, actually all the way into the hall and the bathroom for about a week after. As much as I cleaned, the stains kept magically appearing!!! So two hands people, learn from my mistakes. Anyway, this is what you end up with:


I think there's something about that instant coffee that foams right up, especially if you use skim milk. You could also add some ice cream, but I leave that for a special treat, not a regular. Not so conducive to the Mediterranean Diet - although certainly not outlawed. Moderation, people.

If you're going to try just one of the recipes I've posted up to now, I sure hope it's this one. It is a huge staple in my family, and I've converted many friends as well. I hope you enjoy it, I'd love to hear if anyone tries it out at home!

Have a great day, and enjoy the summer while it lasts!


Wednesday 20 July 2011

Wednesday Weigh-In July 20th 2011

So... not the best way to start off my latest blog, but my first week wasn't my best. I feel like I made some minor changes, but could have done sooo much more. I did lift weights twice, as mentioned, but I didn't get nearly enough cardio. I know that in this case, slow and steady wins the race is may be my cliche to live by, but I need to really kick it up this week.


Original Start Weight: 173
07/13/2011 Start Weight: 155 lbs
Present weight: 154.5 lbs
Goal Weight: 130-135 ish lbs

None Scale Goals:
  • To keep doing at least 2-3 days a week of weight training
  • To try and fit in a minimum of 20 minutes of cardio 5 days per week.
  • Practice eating slowly. SLOWER!
Wish me luck!

Tuesday 19 July 2011

Watermelon-Lime Granita

So as I've written about quite a bit, a big part of what I'm doing these days is trying to eat foods that are less processed. This one really does fit the bill. I also mentioned earlier this week that I'd like to cut down on the Mr. Freeze addiction... Well, I did cut down, but could do better, and I could see this being a really refreshing replacement. What is Granita, you ask? Basically, think of the homemade version of a Slurpie or Slush, depending on where you live I guess, only less liquidy. I got the recipe from my local grocery store.  So here we go, Watermelon-Lime Granita.

For the heck of it, here's a crazy watermelon picture. Don't you think these are strange? Apparently they are just grown in boxes or something like that, and were invented because Japanese grocery stores didn't have room for the space-wasting regular old watermelons. You can read all about it here, which is where I got this great pic. Fascinating. Anyway, enjoy!


 Ingredients:

  • 1 lb seedless watermelon
  • 1 tbsp clear corn syrup ( I had clear - for the amount used, no big deal)
  • 1 tbsp lime juice
  • 1/3 cup water
I had a watermelon that we cut into earlier in the week. It wasn't the best, which inspired me to find a recipe. My 3/4 of a watermelon turned out to be just about 4 lbs, so I multiplied everything by 4.


So first, whizz up the cut up watermelon in the food processor or blender 'til it's nice and smooth.


Strain out the watermelon juice. Lately, what with it being cocktail season and all, I've been playing around with different watermelon drinks, and I always find they have this weird frothiness to them. I really think this step could be the key to perfecting whatever it is you are putting together with watermelon, because this dessert doesn't have that weird texture to it at all. I ended up with tons of pulp in the strainer. Shocking!


Stir in the rest of the ingredients. Pour it into a square or rectangular dish. Stick it in the freezer.


Every 30 minutes or so, drag the fork along the watermelon mixture, kind of like raking. This keeps it from being one big chunk of watermelon ice. This was about half way through.


So I forgot to take a snap of the Granita in a serving bowl. But here's the fancy close up I took! A link-party worthy pic, no doubt! The process took several ours. I put this together before lunch, and by the time we were ready to have some after dinner, it was mostly frozen, but not completely. The next morning, it was pretty solid, and so I left it out for about a half an hour, and at that point, I was able to stir / bash it up into what it was supposed to be.

Some suggestions:
  • I certainly think this could become an alcoholic beverage. When we ate it for dessert, I drizzled it with watermelon rum, but it was too strong. I think I would possibly try straight rum and maybe some 7up. Fresh mint or basil would go really well with this in drink or dessert form.
  • It is a good idea to taste the mixture before it freezes. You may want a little more lime or corn syrup, depending how good your watermelon is. 
  • Conclusion: Very refreshing, low calorie and minimally processed, tasty dessert. Would for sure do it again, especially for a party. If you really wanted to be healthy, I'm sure you could substitute some agave nectar or honey for the corn syrup. Think about how economical this is too.
Enjoy!