Wednesday, 31 August 2011

Barbie Cake Part 1 - The Fondant

Making Marshmallow Fondant In The Bread Machine...

So I haven't shared this aspect of my culinary skills with you yet, but I sometimes decorate cakes. It's something that I really love to do, but also something that takes a lot out of me, so I don't get to do it all that often anymore. I am currently in the process of making a cake for my good friend Elizabeth, who's daughter is turning 2. She is, like so many two year old girls, having a princess birthday theme, and so Mommy really wanted me to make a kind of pink version of this cake, which I made for another friend's bridal shower when she got married. 


So I decided that, although it is not at all in the theme of the Mediterranean Diet, I would share my cake decorating experience with you as I make this cake, because it would be nice to pass on some of the tips I've picked up along the way. This is really a live and learn kind of project, and I usually end up in tears at some point while decorating, just because I'm a perfectionist and this is really intense work. 

Today, as there were no subbing jobs, I tackled the fondant. I have a love/hate relationship with fondant. On the one hand, it makes a beautiful, polished looking cake, but on the other hand, it's one of the most tedious element of decorating. Most fondant cakes that I make take at least 6 hours to decorate. I always make Wilton Rolled Marshmallow Fondant, so if you want the recipe, you should check it out. It is much cheaper and tastier than store-bought fondant. If you've never worked with it, it's much like working with play-doe, but more on actual decorating in future posts about this cake. I'm sooo not there yet. 

As I said, the actual making of fondant is far from my favourite part of decorating.. You have to basically need it like bread, but for a really long time, about 10 minutes or more. If you've been paying attention to my past posts, you know that my bread machine is my favourite kitchen tools. So the last time I made fondant, I realised it would be a great idea to make the fondant on the dough cycle, and let it do the work for me. This turned out to be an excellent idea... I doubt I'd ever make it by hand again. It was painless!

So here's what I did:


First off, because I didn't want to overload my machine, I halved the recipe and did it twice. It was still much easier than doing it by hand. You start off by microwaving your marshmallows with a little water for thirty seconds at a time, and stirring them, until they are completely smooth and melted. If you want all (or half in this case) of your fondant to be one colour, because maybe you're topping your cake with it, this is the best time to add your colour, which I actually forgot to do. Oh well! A word from the wise: Don't use those liquid food colours, use the gel based by Wilton. They are far better quality, and have a much bigger selection of colour. Yes they are more expensive, but you also use way less. ANYway....


I essentially dumped in all of the ingredients, marshmallows first, followed by crisco and icing sugar, and let it run! I actually started with a little less icing sugar and then added the rest in later, just to test, but it definitely still needed the full amount, so the second time around, I just added it all in. 


If you do end up adding more icing sugar, watch out, it'll jump back out at you!!! What a huge mess!


That's basically it! You know it's a good consistency when it's not tacky anymore, but you can sort of stretch it out without it ripping. If it is tacky, add a little more icing sugar. If it won't pick up all the icing sugar and rips when you try to stretch it a little, add water 1/2 a tbsp at a time. 


Like I said, I tried to add the colour at the end of the second batch, but the machine wasn't fast enough for me, I ended up needing it in by hand. I think the dough kind of looks like a Campino... When your colouring is done, wrap up the fondant tightly and stick it in the fridge overnight. 

That's all for now. Stay tuned for making the dress mold. What it's made of: pink rice krispie treats!
Have a great day!


Tuesday, 30 August 2011

Grilled Corn Avocado Salad

A real simple one today folks. 'Tis the season to eat lots of corn! I'll take it while it lasts. A little while ago, we grilled up some corn on the charcoal bbq. We tend to overdo it a little, just because whenever I see, for example, 6 ears of corn for $1.99, I always feel the need to get my money's worth and by the 6, which we never finish between the two of us. Corn salad is the perfect way to use up the leftovers, without feeling like you're eating the very same thing that same week.


Here's what I put in my corn salad this time (it always changes depending what's in the fridge):

The Salad 

3 ears of corn
1 previously grilled zucchini, chopped into bite size pieces
About 1/4 of a green pepper, roughly diced
1 avocado, roughly diced
1/4 cup or so sliced or diced red onion
2 handfuls cherry tomatoes, halved
a small handful of chopped chives
a small handful of chopped cilantro or parsley (optional- I didn't have any on hand)

The Dressing


2-3 Tbsp olive oil
1 Tbsp lime juice
2 tsp lemon juice
1 tsp red wine vinegar
a few dashes of Tabasco Sauce
plenty of salt and pepper


Dump in all of the chopped ingredients. Carefully chop all of the corn off the ears, and break it up. I don't completely break it up, because I sort of like the rustic look of a few clusters still left whole. 


As with my Greek Salad, I prefer to dump in the dressing ingredients into the bowl, and this is another one that throws the proportions of 3:1 oil and acid out the window... I don't think it's so much that I don't like salads to be oily but more that I like them to be vinegary. 


 There it is, dear readers. Nothing life changing, but it sure is a great, tasty way to use up those leftovers!!!

Have a great day!


Sunday, 28 August 2011

Blog Award AND How to Pick A Watermelon

First off, I would love to think Jacque over at her Soda Parlor. She recently awarded me with the Versatile Blogger Award. What bigger compliment can there be? Her blog is pretty awesome, and she's been really busy building it up these days. Lots of new followers, a new template, it's looking great. SO, she picked me, along with nine other new and exciting finds, to receive this award:


Here's how it works:

After accepting the Versatile Blogger Award, the blogger must:

1. Thank the person who gave the award and link back to them in your post (I guess I'm a bit of a dope. I spent days looking for the code to do this, and you just have to save or copy the actual image of the award. Just saying.)
2. Share seven things about yourself
3. Pass this award along to 10 recently discovered blogs

Here are seven things all about moi, in no specific order at all:
1. I speak English, French, and understand lots of Greek
2. I am a teacher by day.
3. I wish I could incorporate food into my work, but can't imagine working in a restaurant (hence, the blog...)
4. I love Christmas, and am already starting to get warm fuzzy feelings thinking of new traditions to start.
5. My husband and I have been together for over 13 years (since we were 15) and he is my rock.
6. Seeing pictures of beautiful beaches makes me sick to my stomach out of desire....
7. I strongly believe in the Law of Attraction. You should check it out!
8. I have recently discovered that the secret to life can be found in a soft boiled egg.
9. My small group of friends are the best bunch of peeps I could ever ask to have.
10. I have a really great trick to pick watermelons!!! See below.

Here are ten different blogs I have recently discovered, and I really hope you'll check them out!
1. Beer. Butter. Bacon
2. Elsa's Cooking Diary
3. Hun, What's for dinner?
4. Little Quilt Stars
5. Mushki Loves
6. My Little Expat Kitchen
7. Red Door Kitchen
8. The Sweet Swiper
9. Lovely Little Snippets
10. I Design

And now..... drum roll please.... My Big Secret For Picking Great Watermelon..... Seriously though folks, I've been picking some great ones now that I know this. You always here about knocking on watermelons to see if they are ready or not. Some people say the high sound is right, some say the low sound. Some say it should sound empty, or like a basketball... Well I had some success with this in the past, and then at the beginning of the year, I guess I mixed up my strategy, and started going for the high sounding watermelons instead of the low sounding ones. I was picking the most useless watermelons out there! Not to mention the fact that I would stand there for like a whole five minutes, knocking on each and every watermelon in the grocery store... Forget it! 

The trick, ladies and gentlemen, is this: Most watermelons have a discolored flat spot on them. I used to avoid these, because I thought they were ugly and therefore no good. It turns out, these flat spots are where the watermelons sort of landed on the ground the ground while still growing. If the discolored flat spot is a buttery yellow, that means the watermelons had a chance to hang out on the ground in the sunshine, and get nice and ripe before they were picked. If they are a more greenish yellow, not so much. Rodale.com did an article about this, and had this great picture that really showcased these butter-yellow spots.


So, that's the news of the day. Hope you enjoy the rest of your weekend!

Saturday, 27 August 2011

My First Giveaway!!!

I'm very excited to announce my first ever giveaway! That's right ladies and gentlemen, you read it right. This giveaway is for a 5" x 7" white picture frame with a blue skittles picture that I LOVE (I know, it's not very Mediterranean of me, but I still think it's a cute picture). I think it would look great in a kitchen or kids room (boy or girl). Check it out!


 All you have to do is follow! This giveaway will last for two weeks, and all you have to do is follow me! The winner will be announced on Saturday, September 10th, and will be picked at random. Good luck to you all!

Have a great weekend!

Friday, 26 August 2011

Challah Bread

No Feature Friday this week, I've been a little out of touch with my fellow bloggers this week, what with the stress of seeing what's going on in my other life, teaching. So far, not much. I'm fine with that, it just means more freedom to do what I want, but still substitute. When I do this I actually take home more money than teaching full time, plus, when the day's done, it's done. No planning, no correcting. What was I stressed over again??? Anyway, I'm slowly coming back to reality and will feature some great recipes next week. 

On to the bread... I love Challah... It's really one of my favs. And whenever I make this bread, people seem to go nuts over it. Here's the book I got the recipe from, it's my favourite book.

Easy Bread Machine Recipes: For 1, 1/2 & 2 Lb. Machines 

I borrowed it from one of my fav. people, K over at http://thelittlestcrafter.blogspot.com/, when she, along along with some of my other closest friends, bought my my most loved kitchen tool, my bread machine. I love this book so much that I over used it - it got a little dirty - and had to order her another one, which reminds me, I keep forgetting to give it to her!

Anyway, if you don't know, challah bread is basically a Jewish egg bread, and it's a slightly sweater bread. I really love this recipe, I hope you will too!


Here's my recipe. I'm bold-ing the ingredients because some of them are written within the instructions. Don't you hate that when you don't realize you need something that you didn't know you would be using because you didn't read the instructions carefully?!?!?
Load the following into your bread maker on the dough cycle according to the machine's instructions:

1 egg plus water to fill 7/8 cup
1 Tbsp veg oil
1 1/2 tsp sugar
2 1/4 cups all-purpose flour
1 tsp salt
1 1/2 tsp quick rise or bread machine yeast
Then, squish down your bowl. Sorry, I forgot to take pics of this process. But you get the idea. Leave the dough rest for 5-10 minutes, then divide it into three portions and let it rest for a few more minutes. Then, roll the three balls into a sort of snake shape until they are about 14 inches long. Braid them loosely, because the dough will rise quite a bit! Let the dough rise for 45 minutes. Then beat an egg yolk with 2 tsp water and brush it on top of the dough. Sprinkle the loaf with sesame or poppy seeds (here in Quebec, we have a large Jewish community, and I've only ever seen this bread with sesame seeds, but that's just me). Bake this beautiful bread for 35 minutes at 360°F. 


This bread is good for just about anything. But it does make an egg-cellent sandwich! I'm sorry, I just had to go there...


Have a great day!


Wednesday, 24 August 2011

What-You-Eat Wednesday!

Welcome to another addition of What-You-Eat Wednesday, in which I feature a (usually) diet friendly but soooo not good for you overly processed food. Here we go, hope you'll take a stab at it:


Water, Glucose-Fructose/Sugar, Citric Acid, Simulated Flavours, Sodium Carboxymethyl Cellulose , Less than 1/10 of 1% Sodium Benzoate and Potassium Sorbate , Colour  Red # 40, Blue # 1, and Yellow # 6, 

Tuesday, 23 August 2011

Spicy Grilled Bobby Flay -ish Oysters

Phew! The last 4 days have been so incredibly busy, I can't believe I haven't posted! Good busy though.

Friday, I was babysitting two of my favourite kiddos all day. Saturday I went to the market with my mom and grandmother, where there was an interesting garlic festival. Then we went to one of my favourite restaurants on the lake, and had amazing pizza. My mom and grandmother had a roasted vegetable pizza with eggplant, beets, asperagus and green onions, and I had a sundried tomato- goat cheese pizza with oyster mushrooms. De-lish! Sunday we went to my brother in-laws house for a family bbq. Then yesterday, since my poor house paid the price for all of those events, I spent my morning cleaning and doing groceries, and then I tutored a sweet little girl that I taught last year. BIG SIGH... Now it's sort of calming down. I'm also pretty anxious to see if I get any sort of teaching position this year, which I may find out this week, or if I'll be subbing again. There are benefits to both, but it sure makes me upity just waiting to see.

So today, I'll be posting a grilled oyster recipe that I came up with a while ago. I say Bobby Flay-ish because I got my basic idea for the base of my sauce from him, with a few changes, but you can check out right here.  The biggest difference, though, is that I didn't cook the sauce, I wanted a more fresh flavour.

  • 2 tablespoons canola oil
  • 1 very ripe large beefsteak tomatoes, halved, seeded and coarsely chopped
  • 1 cloves garlic, smashed
  • 1 green onion, thinly sliced
  • 2 Tbsp olive oil
  • 1 Tbsp chopped fresh flat-leaf parsley, plus leaves for garnish
  • 1 Tbsp red wine vinegar
  • 1 tsp honey
  • 1/2 tsp chopped fresh oregano
  • 1/4 teaspoon red chile flakes (or more if you prefer it really spicy)
  • Salt and freshly ground black pepper 
  • 8 fresh medium sized oysters
So first I dumped everything into my handy dandy Magic Bullet. Well, not the oysters, obviously...   


Then I CAREFULLY pried the oysters. This was really a challenge, and I actually lost a knife doing so... It kept losing little slivers of metal. Not to mention I almost stabbed myself a few times. I was worried all night that I would be ingesting metal shards.... I need a proper oyster-shucking knife, me thinks.


Anyway, I did get the how-to from the Canadian Great, Chef Michael Smith. It was really helpful despite the difficulty I still had.


So this is pretty much what I ended up with. I bought 8, and was able to open 7 of them. I consider that a big success! Make sure to try and keep that liquid inside them, it's all good stuff. All I did was broil them for about a minute. You can obviously eat them raw, but so far, I'm not such a fan of that.


Just add a little spoonful to each oyster half, and slurp away! Easy (other than the shucking) and absolutely fantastic!

Have  great day!

    Thursday, 18 August 2011

    The Taco Bar Part 3

    The Actual Taco Bar


    So today, for Part 3 of The Taco Bar, I thought I'd take you through my list of things I served on my birthday taco bash, including a couple of quick throw together recipes. The great thing about having a taco bar is that everyone can go for what they like best, and you don't have to worry about someone hating a particular food. I wanted to make it more interesting than your standard beef tacos with hard taco shells (although, that's ultimately what I ended up eating all night since my hubby doesn't love those so I rarely eat them even though I LOOOOOOVE them). Here's the spread I put out:


    • Soft flour tortillas
    • Crunchy taco shells
    • Tilapia Tacos (See recipe below)
    • Citrus Pork Tacos (See recipe below
    • Good Old El Paso Beef Tacos
    • Refried pinto beans heated with a handful of sharp cheddar and a few big spoons of salsa (so much tastier that way)
    • Guacamole (See recipe below)
    • Full-fat sour cream
    • Salsa
    • A variety of hot sauces
    • Grated sharp cheddar
    • Diced tomatoes
    • Sliced red onion
    • Sliced green onions (also called shallots pronounced sha-LLOTs in some parts of Canada including my house, but don't get me started on that discussion)
    • Finely shredded Romaine lettuce
    • Finely shredded red cabbage tossed with some lime juice, honey, olive oil and salt
    • Rice with greens in it
    • Corn on the cob
    • I think that's it....
    Ok, so like I said, I wanted a variety of tacos, and I ended up with four: Tilapia, Pork, Beef and Bean. I feel the need to capitalize them for some reason. As my 3rd grade teacher would have said, they are very important tacos...  The recipes are more just throw together type recipes, but here they are:

    Tilapia Tacos:


    A word on fish tacos: Awesome. I actually prefer Mahi Mahi, but I had Tilapia on hand. Any firm, white fish will do. About 1 filet per person.

    •  Season raw fish with salt and pepper. Heat about a tablespoon of oil in a caste iron pan to about medium, and fry up the fish. When it's fully cooked, sprinkle with 1 or 2 tablespoons of lime or lemon juice, and a small amount of chopped fresh cilantro. I like to put it in the serving dish and sort of slice it with the end of my spatula, since it's so soft anyway. Easy-peasy. Nothing complicated here folks, but just awesome fish taconess. 
    Seriously though, everyone in Quebec seems to scrunch up their faces when I tell them about fish tacos, but it is the $#!+ in California and Latin America.... Sorry, I don't swear on my blog, but it really is. I serve mine with cabbage, tomatoes, red onion, sour cream and salsa.

    Citrus Pork Tacos


    This was a last minute decision to make this, because I was looking at my Tilapia and I new it wouldn't be enough.
    • Marinate 1 1/2 lbs of any port that you would eat after cooking after a short time (tenderloin, pork chops, etc) in about equal parts orange juice, and about 2 tbsp fresh oregano, salt and pepper. Let sit for a couple of hours.
    • Fry the pork, again in a caste iron pan if you have one. Let it rest for about 10 minutes, and slice it paper thin across the grain. That's it! Very tasty. 
    Easy Authentic Guacamole


    There is a tendency, at least in Canada, to over-complicate guacamole. Guacamole spice mix, adding cream cheese or sour cream, putting in salsa (actually I admit I sometimes do that), you name it. I mean, not to say that any of these are bad, I actually like them fine. I have a friend who makes a great guac by adding a huge whack of cream cheese to it. I don't think I've ever met a guacamole I didn't like. But why make things harder than they need to be? I don't think anyone in Mexico is going out for a last minute trip to the market because they forgot the guacamole mix......Here is a very basic, but authentic recipe. Actually, you can even make it with the first 4 ingredients and it will be great.

    Mush together:
    • 4-5 ripe avocados
    • 1 clove finely chopped garlic
    • 1 or more tbsp lime (or lemon) juice
    • salt
    • finely diced jalepeno pepper or a few dashes of tabasco
    • some finely diced tomato
    • about 1 tbps fresh chopped cilantro (optional- I know lots of people hate it)

      That about wraps it up (ahem...pardon the pun) for Part 3 of The Taco Bar. Tune in tomorrow for the 4th and final part of this segment: The Dessert Taco...

      Have a great day! 


      Wednesday, 17 August 2011

      What-You-Eat Wednesday

      Welcome to another edition of this week's What-You-Eat Wednesday! Every Wednesday, I feature a mystery food, filled with wonderful chemicals, often advertised as a healthier option. Please take a stab at guessing what it is. Here's this week's mystery food:

      WATER, VINEGAR, MODIFIED CORNSTARCH, SUGAR, HIGH FRUCTOSE CORN SYRUP, SOYBEAN OIL*, CONTAINS LESS THAN 2% OF SALT, NATURAL FLAVOR, CELLULOSE GEL, ARTIFICIAL COLOR, XANTHAN GUM, EGG YOLKS*, MUSTARD FLOUR, LACTIC ACID, PHOSPHORIC ACID, CELLULOSE GUM, VITAMIN E ACETATE, LEMON JUICE CONCENTRATE, DRIED GARLIC, DRIED ONIONS, SPICE, YELLOW 6, BETA CAROTENE (COLOR), BLUE 1, WITH POTASSIUM SORBATE AND CALCIUM DISODIUM EDTA AS PRESERVATIVES. CONTAINS: EGG. *TRIVIAL SOURCE OF FAT AND CHOLESTEROL.

      Enjoy! Have a great day!

      Tuesday, 16 August 2011

      The Taco Bar Part 2

      Pre-Taco Snacks: Cheddar Corn Muffins


      About 3 hours before guests arrived, I realized we wouldn't be eating until quite late, because some of the guests could only get there at about 7-7:30. I needed something to hold over my hungry guests other than alcohol! The last thing I felt like serving was chips and salsa, because that's sort of like the same stuff you'd eat during the meal. So I decided to go for a favourite of my mom's while I was growing up, cheddar corn muffins. The only trouble was, I didn't have a good corn muffin recipe. So I did what I always do in that case: went to all-recipes.com. I love that site, because of the comments and reviews. If 2 491 people rate it at five stars, it can't be so bad. And that was the case with this corn bread recipe. All I did was add cheese and turn them into muffins. 

      Here's the recipe (Makes about 40 mini corn muffins):

      • 1/2 cup butter
      • 2/3 cup white sugar
      • 2 eggs
      • 1 cup buttermilk
      • 1/2 teaspoon baking soda
      • 1 cup cornmeal
      • 1 cup all-purpose flour
      • 1/2 teaspoon salt
      Then
      • 1 cup of shredded sharp cheddar cheese
      The recipe got pretty fancy with its directions. You can check them out here. I didn't think they were necessary. I just whisked together the butter, melted, and the sugar. Then I dumped in the rest of the wet ingredients, followed by the dry. Easy! Then I added half my cheese. I suppose you could also add chilis and chopped ham at this point if you wanted to, but that wasn't what I was going for, I wanted a more delicate flavour with all the taco bar fixin's to come!


      I scooped the batter into greased mini muffin tins, topped with a few shreds of cheddar, and popped them in the oven for 15 minutes on 375° F, and a toothpick came out perfectly clean.

        Monday, 15 August 2011

        The Taco Bar Part 1

         The Decorations: Mexican Paper Flowers


        Welcome to the first post in a week long series called The Taco Bar. As I mentioned, last weekend was my birthday. This year, instead of going out, I decided that I wanted to create a taco bar at home. So I decided I would share my birthday creations with you this week! Is it all very Mediterranean? So so. But, it was my birthday so I ate what I wanted!

        Being that it was my own birthday, I wasn't wanting to spend a lot on decorations, other than a few purchases from the good ol' dollar store. When I searched online, I found lots of great ideas. Piñatas, Mexican hats, you name it. But again, it was my own birthday, how much money would that have cost??? But then I found this great, free-for-me idea (because of my ridiculous tissue paper stock) to make Mexican Paper Flowers. I hadn't heard of them before, but they were super cute and I think they turned out great! This is the video I used to learn how to do it, it's very well explained. Check it out:


        I had lots of fun playing off the many colours I was already trying to put in the room, especially red, yellow, green, and somehow I always end up with lots of blue in everything I do. It's just my colour, I guess.... Here are some pics to show you how they turned out.


        You can see in this pic that I had created a different edge on the paper for each flower. The video suggests you fold the paper, and then cut it. Well, I tried that, but I found it extremely hard to cut through. Maybe it was my scissors, but I'd suggest lining up the papers and then folding them over once or twice, then cutting your edge. Then unfold them the way the video instructs.


        I just think this one looks totally awesome. Thankfully, since I didn't have much time during the party, my great buddy K from http://thelittlestcrafter.blogspot.com/ grabbed the camera and snapped away. I have no idea how she got this one to look so cool, but it is!


        Another random shot...


        And good times were had by all....

        Sunday, 14 August 2011

        The Best Sunday Breakfast

        So with our 4 day mini stay-cation coming to the end, I thought I'd share the most simple, but most delicious breakfast that I came up with this morning, in part because I was starving, in part because I have an amazing new olive oil I love, and in part because I was watching Julia Roberts eat breakfast in her Roman apartment enjoying what they describe in Eat Pray Love as “Il Dolce Far Niente” - The Art of Doing Nothing.


        The past 4 days have been great. Yesterday was my birthday, and so I've had a weekend filled with good times and have been feeling that great birthday love. One of the things I had put on my birthday wish list (almost all of them food-related, naturally) was really good olive oil. Two of our close friends, another married couple, bought me two really interesting bottles. I haven't really opened the second one, but this first one, a Portuguese olive oil, is supposed to be award winning and I'm in love with it. 


        So, strange as it sounds, for some reason I have never eaten a soft boiled egg. And, for some reason, I was compelled to have them this morning. I just felt like with a drizzle of olive oil, it could be magical. I was right. This must have been by far my favourite breakfast of the year, for sure. If you, like me, have never soft boiled an egg, by the way, the timing goes like this: 

        1. Boil water
        2. Add eggs to boiling water
        3. Boil eggs in water for 7 minutes.
        Isn't there some joke about the over-simplicity of recipes showing "how to boil an egg"? Oh well, if you've never done it, you can't just know how to do it all by yourself, unless you feel like experimenting with many dozens of eggs, and who wants to do that? Anyway, the whites were perfectly cooked, no stringy stuff, but still creamy, and the yolks had just begin to cook around the edges, but the middles were  slightly thickened by still runny. 


        I had picked some tomatoes from the garden the day before, so I used up the rest of them by simply cutting them half. I also happened to have some roasted peppers tossed in balsamic vinegar and olive oil, and added a tiny piece of runny goat cheese. Nothing complicated here. I drizzled a small amount of that amazing olive oil over the eggs and tomatoes, added salt and pepper, and this was seriously the best breakfast. The Mediterranean Diet, and lifestyle, are all about appreciating the simple pleasures in life. And boy did I ever this morning!


        I hope you get to take some time to live the good life and work on “Il Dolce Far Niente" on this fine Sunday. Have a great day!

        Thursday, 11 August 2011

        What-You-Eat Wednesday Reveal

        No recipe today folks. The hubster and I are taking a mini stay-cation for the next 4 days, and so I don't have time to write a ton, but I will try and check in every day.


        Yesterday I posted the ingredients to another What-You-Eat Wednesday, and the two guesses were absolutely right on. You guys are too good, I'm going to have to make these trickier! The mystery food was Apple Nutri-Grain bars!


        Wednesday, 10 August 2011

        What-You-Eat Wednesday

        Welcome to round two of What-You-Eat Wednesday, where I feature a mystery product, usually diet related.

        But first, I wanted to show you a clip of Anthony Bourdain's visit to Tuscany on his show, No Reservations. I just think it's an interesting snap shot of the difference between American and Mediterranean food ideals.  The part of the video I really want you to see is him cooking for some locals, including who I'm sure is his future wife at the time, and their reaction to his westernized take on their food. It appears at about 10 minutes and 50 seconds. I'm posting a whole 15 minutes or so of video, because I'm not too sure where I can edit a video, but also because I love No Reservations, and think some of you might enjoy watching the rest of the clip. Parts two and three of the episode can easily be found on youtube.  Enjoy, and I'd love to hear your thoughts.


        Here's this week's mystery food:


        WHOLE GRAIN OATS, ENRICHED FLOUR (WHEAT FLOUR, NIACIN, REDUCED IRON, THIAMIN MONONITRATE [VITAMIN B1], RIBOFLAVIN [VITAMIN B2], FOLIC ACID), WHOLE WHEAT FLOUR, SOYBEAN OIL (WITH TBHQ AND CITRIC ACID FOR FRESHNESS), HIGH FRUCTOSE CORN SYRUP, SOLUBLE CORN FIBER, SUGAR, CALCIUM CARBONATE, WHEY, WHEAT BRAN, SALT, CELLULOSE, POTASSIUM BICARBONATE, CINNAMON, PROPYLENE GLYCOL, MONO- AND DIGLYCERIDES, SOY LECITHIN, NATURAL AND ARTIFICIAL FLAVOR, WHEAT GLUTEN, CORNSTARCH, NIACINAMIDE, VITAMIN A PALMITATE, CARRAGEENAN, ZINC OXIDE, REDUCED IRON, GUAR GUM, PYRIDOXINE HYDROCHLORIDE (VITAMIN B6), THIAMIN HYDROCHLORIDE (VITAMIN B1), RIBOFLAVIN (VITAMIN B2), FOLIC ACID.  HIGH FRUCTOSE CORN SYRUP, CORN SYRUP, APPLE PUREE CONCENTRATE, GLYCERIN,  SUGAR, WATER, SODIUM ALGINATE, MODIFIED CORN STARCH, MALIC ACID, METHYLCELLULOSE, CALCIUM PHOSPHATE, CINNAMON, CITRIC ACID, CARAMEL COLOR.

        The only hint that you get are the first two ingredients. It's clearly a grain product...

        Any guesses????

        Tuesday, 9 August 2011

        Garlic Scape Pesto


        Most people I know don't really know much about garlic scapes. I, myself, learned what they were from a colleague at the school I taught at about 2 years ago. From what I understand, it is a flowering stem of the garlic plant that is removed from the plant so that the garlic bulbs can get more nutrients. Something like that, anyway. Think of it like a garlicky cousin to the green onion or chive. A few weeks ago, I was at the local farmers market, and found them for very cheap, so I had to buy them. 


        They stayed in my fridge for a quite some time, and as you can see, they surprisingly did not go bad. I used one or two here and there in an omelette or on pizza, but didn't really have a good use for the whole bunch. Then I saw this recipe for Garlic Scape Pesto on Cindy's blog, hunwhatsfordinner.blogspot.com and decided it would be the perfect thing to do. I changed it up and made it my own, as we all do, but the recipe for the basic pesto is the same, so check it out for the details.


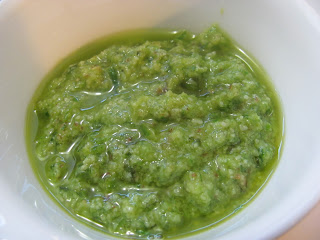
        The ingredients here are good, basic ingredients: Fresh parmesan, garlic scapes, olive oil, pine nuts (I only had a few pine nuts so I topped them off with raw almonds), olive oil, salt and pepper. I did everything in my trusty old food processor, which is a big plus. This is what it turned out like after I drizzled in all the olive oil. I love the colour. I then tasted it, and knew I'd want to use it in more than one part of my meal, but also knew that if I used it all in the same way, it would become redundant. 


        So I took out a few spoonfuls, and cleaned up some regular mushrooms, but left them whole. I added a few tablespoons of the pesto to them, and let them hang out for a while. 


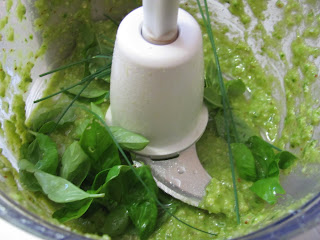
        Then I went out to my balcony and grabbed a handful of basil and chives. I threw them into the mixer, and mixed it up. It just seemed a like a natural addition to me. 


        I put 4 huge chicken breasts in a freezer bag (too many for the two of us, but made great leftovers, which I'll feature another time. Very exciting, let me tell you) and let them sit until I was ready to cook. 


        You may know by now that I am a huge fan of the charcoal bbq. So it was only natural that I wanted to put all of this on the Q.


        The mushrooms turned out ridiculously well. The pesto seemed to create this sort of coating, almost like as though they were breaded but much softer... hard to describe. Maybe the best mushrooms I've ever had.


        We served this all up with Greek Horta, which you can check out here, a few cherry tomatoes from the garden, and I had some baguette left over so I put a little olive oil on that and stuck it on the bbq too. Needless to say, there was wine involved... This was one of my favourite meals I have made in a long time. My husband back-handedly commented something to the effect that he thought the meal was above us because it was so freakin' good. I take that as a good thing. It was outrageously good.... I hope you'll try it! Have a great day!